April 2007
Monthly Archive
Monthly Archive
Have you noticed the incredible inventiveness coming out of the metal clay community? The inventions are coming faster and faster. As an inventor myself (Silicone Texture Plates), I always notice the new inventions out, and usually try them too.
Just in the last thirty days, there have been at least three: the hollow tube extruder adaptors (two different ones from two different companies) and now the mini caulk gun type thing for metal clay syringes. And before that, the Makins Clay screw type extruder became available in stainless steel.
It used to be metal clay-ers had to borrow all their tools from the scrapbookers and the polymer clay people. Now we’re a big enough market that folks are inventing and producing new tools just for us. I think that’s pretty exciting.
Now, those hollow tube extruders I mentioned. One is sold by www.cooltools.us (designed by Hadar Jacobson and called Texture Tube Adaptor) and one by www.pmcsupply.com (called the Hollow Core Adaptor). You may be wondering which one to buy.
Here’s my ten second review.
Both sets are designed to be used with the Makins Clay screw type extruder (the “professional”) in stainless steel or aluminum. Being cheap, and not totally convinced that the stainless steel is necessary, I bought the green aluminum one. Why? Well, I’ve been using the Kemper Klay Gun, which I think is aluminum for years, and no trouble. Plus, maybe the fact that the green one is anodized aluminum makes it okay, maybe that’s why it’s not affecting the clay.
Oops. My ten seconds are up already. I tried both sets of hollow tube adaptors. The one from Cool Tools requires a screw driver to take out. And even then, it was a little hard to get out. Maybe this is because I was using the aluminum extruder. I found the PMC Supply one easier to remove after use.
Both functioned equally well in extruding. The only challenge in using both is making sure everything is lined up so your tube is centered and the walls will all be the same thickness.
So how to choose? They are not that expensive, I would buy both, mostly because the Cool Tools set makes hollow tubes that are a little bit larger. So if it is important to you to have the full range of sizes, you’ll need both sets.
See a super cool youtube video on how to use the Cool Tools adaptors at:
www.youtube.com/watch?v=h15vNIUw_Zg
You can also buy one of the sets from
www.cardinalcreations.net
I have yet to fire my extruded tubes. When they’re fired, I’ll post them.
Great news! You can now buy on line from PMC Tool and Supply! If you don’t recognize the name, you may still recognize the products. This is the website of Chris Darway, metalsmith and PMC guy extraordinaire.
The site is ">www.PMCToolandSupply.com
Chris was the very first company out to invent new tools exclusively for the PMC market. Way back at the 2002 PMC Conference, he was there with the then new PMC Extender Liquid, kiln shelves and a saggar kit. He has continued to invent new products just for the PMC market.
Congrats to Chris for getting on line!
Check out his site, great products, plus tips and tricks. If you like to weave paper type metal clay, look at his “gang blade,” specifically made to cut strips of paper type for weaving. I’ve tried it and it works better than cutting the old fashioned way for getting straights strips.

Choosing a kiln when you’re new to a hobby can be difficult. But it’s not really that complicated. You know when you go shop at Costco (a warehouse club) and let’s say you need a DVD player.
They’ve got three usually. The most expensive, the cheapest, and the in between. They’ve narrowed down the choices for so you don’t have to go to an electronics store and be overwhelmed with choices and features you’ll never use.
I’m going to be Costco for you. I’ll narrow down the choices and keep it simple.
Well, most of us choose based on price and what we need. Here are some choices at different price points:
$555.00 Paragon SC3, computer controlled
$385 list Paragon Firefly, not computer controlled (see for $298.00)
$150.00 Ultra Light Bee Hive Kiln (see previous post)
There are other choces out there as well, I just happen to like Paragon. What can you do with a Paragon SC3? You can fire metal clay, do enamelling, and glass fusing. And you can plug it in, turn it on, and walk away (within reason, don’t leave the house, I just mean you don’t have to babysit the kiln).
The Paragon Firefly is new, a new kiln created to meet that missing price point for kilns. It takes a little more effort to load, since it doesn’t have a door in front that swings open on the front like the SC3. Also, it is not computer controlled, so it will take a little attention. Even so, it’s a big savings over the SC3.
My recommendation? Buy the best you can afford and justify. If you can afford a computer controlled kiln such as the Paragon SC3, then do get it. You’ll love it. It’s easy to use, holds a lot at a time and is a pleasure to use. They’ve improved all the little tiny problems with the SC2; they’ve upgraded the hinges and door catch.
If you don’t have $500.00, but still want a kiln to be able to fire combustible cores and such, I would get the Firefly.
If space is an issue, or you just can’t justify spending $300.00, then get the Ultralight Bee Hive Kiln. It’s terrific and even if you upgrade later, you’ll still want to keep this little kiln.
Why stick with Paragon? Why not? They make quality products, they’ve been around a long time and I expect them to be around in the future. You can buy replacement parts for you kiln, should you need them, and even send your kiln in for a factory repair if needed.
And many jewelry industry/metal clay suppliers carry Paragon, so it’s easy to find and buy.
Want more? Some other folks have written detailed comparisons of the various kilns out there. Here’s a link to the one by Mary Ellin d’Agostino: medacreations
And here’s the one by Tonya at Whole Lotta Whimsey: wholelottawhimsy
If you know of another comparison chart somewhere, or have a kiln to recommend, please post a comment!
Technorati Tags:
choose a kiln, kiln, metal clay
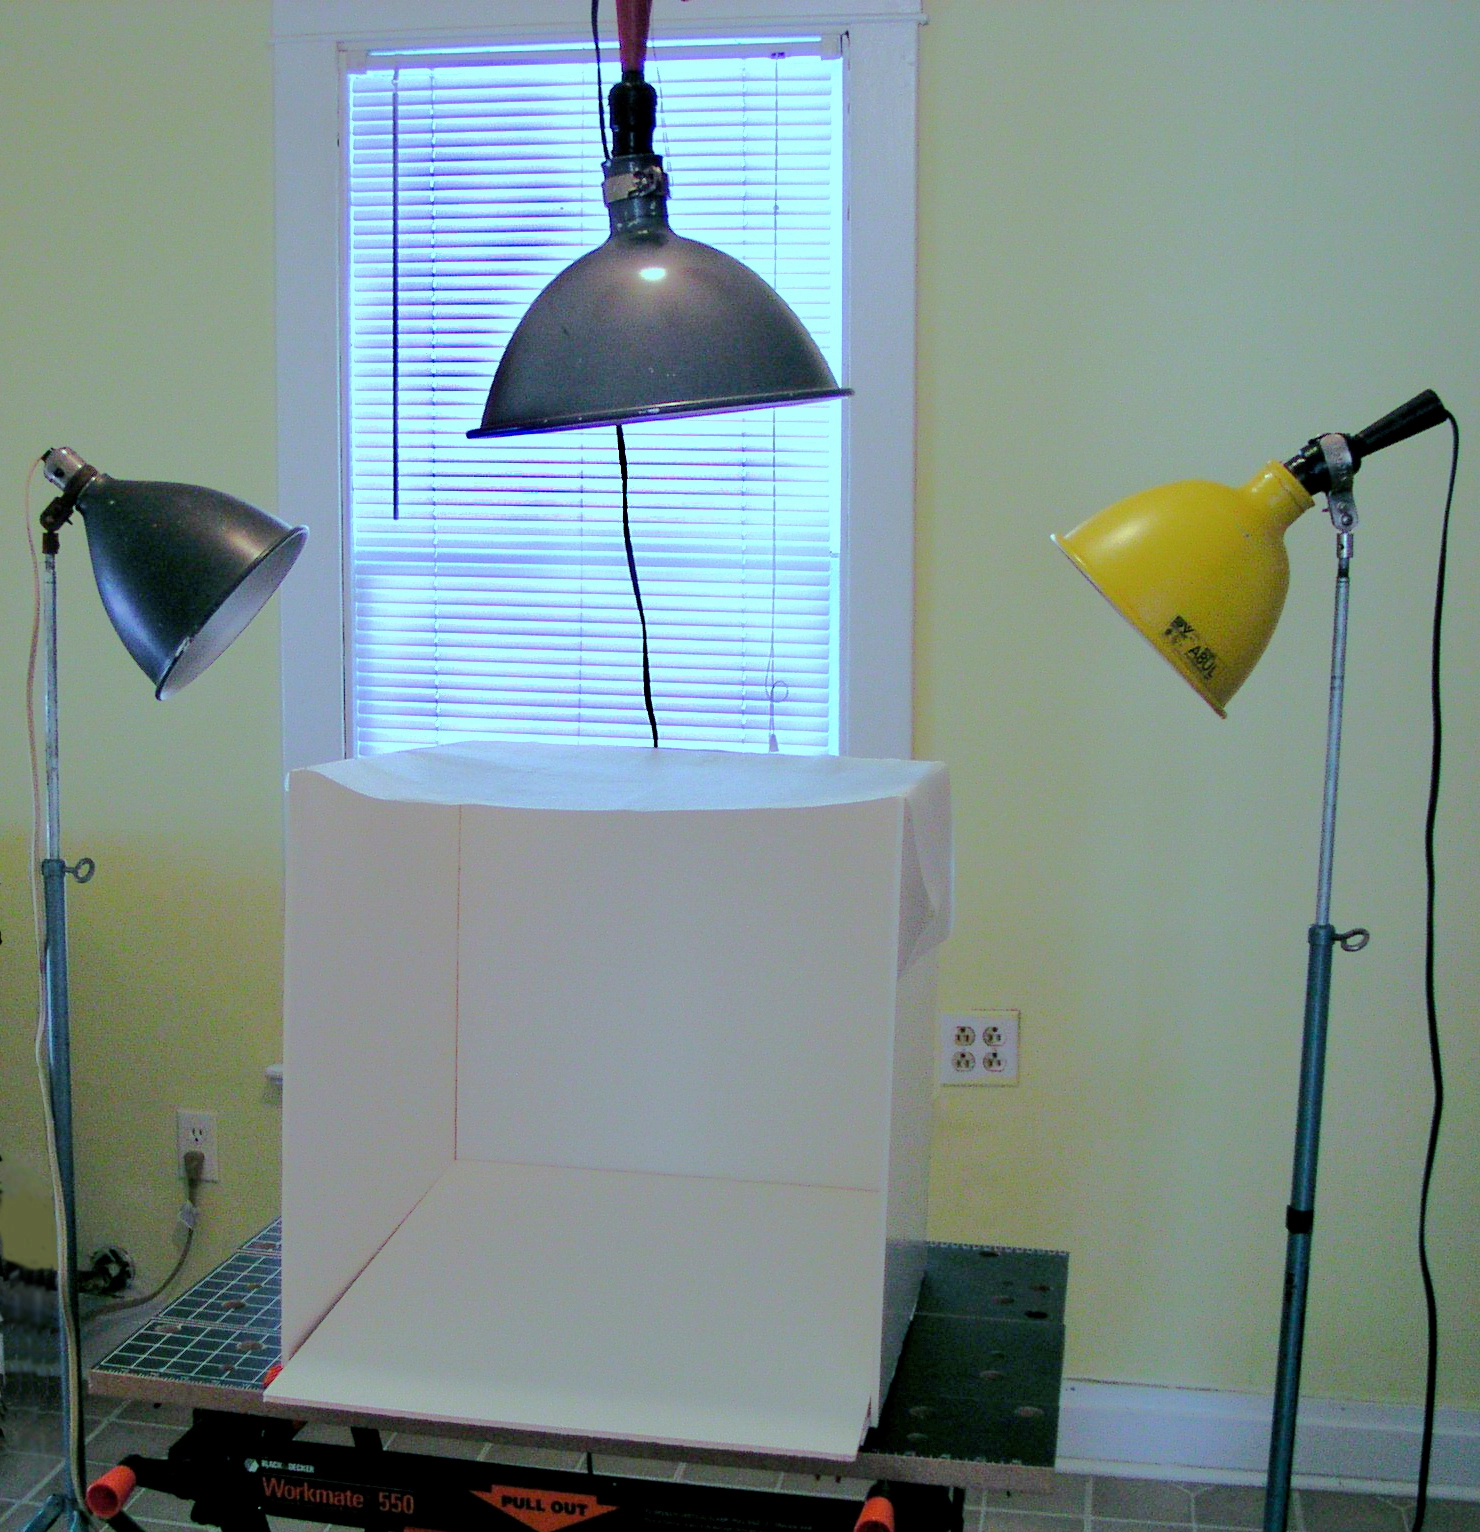
Here’s a photo of my first light box. It’s made out of white foam core, and top is parchment paper. The whole thing is held together with T-pins and disassembles for storage. The lights are blue bulbs, available from your friendly local photo supply house. The two side lights are 250 watts, the top is 500. The top light is hanging from a ceiling fan using a terribly jerry rigged set up involving some coiled copper wire and two hangers — one over each of two fan blades!
I built this based on the exceprts at www.ganoksin.com from Charles Lewton Brain’s book, Small Scale Photography. One quick note: 1. never touch blue bulbs with your hands, use cotton gloves or socks.
Photographing Jewelry
I have tried a few different photo light boxes in the past few years. I’ve posted on them extensively on Orchid and have written articles that have appeared in the newsletter of the Chicago Metal Arts Guild and The North American Felters Network newsletter.
My current favorite lightbox, for size, ease of use, ease of assembly, and presense of a back drop clips is: the Patterson Medium Light box. It was $44.00 when I bought it, I think it’s up to $47.00 now.
You can find it in the studio section at B & H, then light domes and tents. www.bhphotovideo.com
It’s a good size, so you don’t have to worry about running out of backdrop room if you make something big. The backdrop clip is awesome. After years of using jerry rigged systems, I really appreciate this set up. Yes, you could build it yourself for less, but boy they’ve done a nice job for a reasonable price.
To go with that, you can buy seamless back ground paper in a number of colors from most any large photography supply place. If you want gradient gray, you can by that in small, affordable pieces from
www.setshop.com
It’s hard to find. It’s under backgrounds, then tabletop, then gradients.
Other folks recommend printing out your own at home using Photoshop and photo paper.
At a recent meeting of the Windy City Chapter of the PMC Guild, many of us brought our photo light tent set ups to show and for members to try out. People brought jewelry and took test shots.
One of the systems a member brought was the American Recorder “Photo Studio in a Box,” here is a link to one place to buy it:
www.smithgear.com/ar-sib-100.html
This is apparently one of those products that came out to meet the needs of the eBay seller. I was very impressed with how it truly folded flat and also takes less than a minute to set up. It would be more accurate to call it Photo Studio in a bag. The whole thing is in a “bag” the outer parts of which are also it, the light tent. You unzip and unvelcro it, pop out the sides and ta-da! You’re in business!
That is comes with lights and is only $99.00 is incredible. If I needed everything, I would probably get this one. When we used this at the Guild meeting, we added a “ramp” of foam core underneath the background.
Photography Links
Where to learn:
www.tabletopstudio.com go to Product Photography How To
www.ganoksin.com go to library, search for excerpts from Small Scale Photography by Charles Lewton Brain. This is where I got my start and what I based my first set up on.
www.shortcourses.com/studio/tabletop/studio.htm a little “course” in photographing small items
www.wrotniak.net/photo/tips/tabletop.html how to build a $7.00 set up.
www.home-jewelry-business-success-tips.com/photographing-jewelry.html
">www.jewelryphotography.com/
jewelrymaking.about.com/b/a/257634.htm
www.silversmithing.com/1photo.htm article by Cynthia Eid, excellent, complete
How to Build Your own Lightbox:
bermangraphics.com/coolpix/jewelryphoto.htm see a homemade light tent
www.creativepro.com/story/feature/19002.html very detailed how to make your own light tent
www.makezine.com/blog/archive/2006/04/make_your_own_light_tent.html
sodoityourself.com/the-ikea-hamper-light-tent/ this one uses an IKEA hamper!
Where to buy:
Backdrops:
Seamless paper and large gradient gray backgrounds: www.helixphoto.com
Very small gradient gray backgrounds, only $9.99: www.setshop.com
Light tents, domes, etc.
Any photography supplier. Some folks like www.tabletopstudio.com
I happen to have gotten my light tents from: www.bhphotovideo.com
www.photostudiobox.com has an expensive system, $399.00 for the smallest one
(c) Elaine Luther 2007 All Rights Reserved
Technorati Tags:
macro photography, jewelry photography
