July 2007
Monthly Archive
Monthly Archive

Here’s a little stand I made using inexpensive glass from the restaurant supply store. I epoxied the parts together. If you don’t like it for displaying jewelry, you could also use it for food during a home jewelry show.
The point, for either use, is to create interest by having multiple levels.
If you are a member of the PMC Guild, you’ve already read in the latest issue of Fusion how to make your own homemade oil paste using lavender essential oil.
I rushed out and bought some lavender oil as soon as I read the article. Actually, I already was out, reading it in the car, so I just went on the the health food store and got the oil.
I had a chance to test the oil paste this weekend. I had a piece made of two already fired PMC pieces that I had put together with homemade PMC+ thick slip. The two broke apart. So I put them back together with PMC3 homemade oil paste, and fired it at 1650 for 10 minutes. They are now stuck together beautifully, with no fear of them coming part.
If you haven’t gotten around to trying this yet, or wanted to hear from someone else who tried it first, I’m here to say, rush out and get some lavender oil and give it a try. It works great and smells nice to boot!
Update: After reading the tip from Tim McCreight on Metal Clay Gallery, I added 5 drops of rubbing alchohol to my homemade oil paste. That dramatically improved the workability — it wasn’t so slippery. I’ve now used it on more things and continue to have success.
Sometimes, I forget about things that I know. This came up during class last weekend, an Intermediate/Advanced Class at the Indianapolis Art Center.
We were talking about sandblasting and I mentioned the inflatable sandblasting booth. “What?” everyone said. Yep, it’s true, someone makes an inflatable sandblasting booth that you use with disposable cans. Certainly, it’s small, but for occasional use, if you just can’t justify a full set up, this would be a nice option. Check it out here.
The same company sells the cans to spray the sand.
If you want something a bit larger, MAKE posted instructions for a home built one, but it’s a bit complicated and potential dangerous.
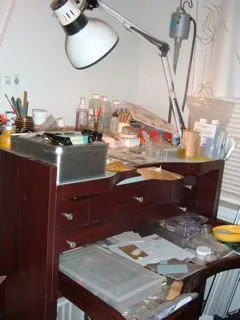
In the spirit of the Ganoksin.com Bench Exchange, here’s a shot of my jeweler’s bench where I do both Precious Metal Clay and metalsmithing.
I didn’t clean it up first, this is what it really looks like right now, with the proects I am in the middle of.

Finding the perfect tool for writing words in metal clay is not easy. Rubber stamps are too large, and metal clay sticks to rubber. I love using typewriter strikers, but they are getting harder and harder to come by, and not everyone loves them as much as I do.
To solve all these problems, I have come up with the photopolymer alphabet tool! It’s a do it yourself project, but that keeps your cost low. The clear part of photopolymer plates cut very easily with scissors. Just cut out each letter and glue them with regular school glue to the backs of pencil erasers! (See photo for a sample.)
The letters are “outies” on the photopolymer plates, which will give you an impression in your metal clay. This makes it easy to use liver of sulphur to darken your letters, making them easy to read.
Check it out at CreativeTextureTools.
Next »
